Sunday, December 28, 2014

BatRep: Warmachine @ 35pts: Cygnar’s Capt.Haley vs Khador’s Komm. Sorscha.

I’ve been playing Privateer Presses’ Warmachine off and on again since it first came out.  It’s been collecting dust for a while as I got sucked into the whirlpool that is Dystopian Wars.  Feeling guilty and knowing we have a very healthy Warmachine / Hordes community locally, it was time to low the dust off some figures and play a game.

For those who don’t know what Warmachine is (Where have you been hiding???), it’s a Steam-Punk fantasy war game based on the world of the Iron Kingdoms.  Large Steam Powered robots called War Jacks, controlled by Warcasters (Warrior Mages) are the “Super-Weapons” of the era.  While all armies have access to the “regular” Infantry and Cavalry (notice the quotes), everyone wants these horrific machines of war to win the battle for them!  Warcasters know various spells and have “Focus” which limits how many spells they can cast AND how active their War Jacks are.  Warcasters are also your army’s Leaders.

Basically, if you kill all the opponent’s Warcasters, the machines go inert and you win! 

The really interesting thing about the game is ALL the army lists are “Broken” or Over-Powered.  The game designers’ philosophy has been if Everything is broken, then the games are fair; it comes down to how brave you are and who play’s their “Broken” tricks, first!  This attitude is notoriously stated on the rule book’s notorious Page 5:

Play Like You Got A Pair.

The Forces:
First, Graham and I decided to do a “Training Mission” as we haven’t been playing in a while.  We selected 35 Points – a “smallish” starting game.  Large enough to take 2-3 War Jacks and a couple of infantry and/or solos, but not so large as to be overwhelming. 

Interestingly, to help balance the game, your choice of Warcaster grants you extra points to which to select your force which must be spent on War Jacks!  The more powerful the caster, the fewer points (in theory).

Cygnar:
Captain Haley (+5 Points – 40 total) with:
Lancer Light Warjack
Defender Heavy Warjack
Journeyman Warcaster with:
Hunter Light Warjack
Unit of 10 Sword Knights
Unit of 10 Long Gunners

Khador:
Kommander Sorscha (+6 Points – 41 total) with:
Behemoth Heavy Warjack
War Dog
Man-O-War Kovnik with:
Jack Marshalled Destroyer Heavy War Jack
Unit of 3 Men-O-War Bombardiers
Winter Guard Field Gun Crew
Winter Guard Mortar Crew
Kovnik Josef Grigorovich (Spent the game with the Mortar Crew)

============================================

So, we picked a 4 X 4 table in the local gaming store and decided to be lazy, play the terrain that was already setup.  From Cygnar’s Left, we had a fence up to a “wood” (1 Palm Tree!) and a hill.  Opposite was a building, a wall and another wood on the right.

I made Graham roll a mission in the Main Rule Book, and we rolled “Killing Field”.

3 Objective markers are setup on the table’s Center Line, one on each side, 8” in from the table edges and one “Dead-Center”.  The Players “Hold Objectives” by moving over the markers, denying their opponent contact to the counter (in our case, due to the “rubble” table and the incorrect size and shape of the objectives, it was good enough just to touch the Objectives.).  A player got 1 Control Point at the end of each turn if they controlled an objective. 
The player won when they had 7 Control Points OR they were the last player with a Warcaster on the table!

Khador won the roll-off so chose that Cygnar would take 1st Player Turn and deploy 1st. 
Behind the woods on the Left, there was the Lancer, the unit of Sword Knights in base-to-base contact, in 2 ranks and Haley behind the Sword Knights.  The Defender setup behind the hill and the Long Gunners setup in a long row to the right of the hill.  Finally, the Journeyman and Hunter setup on the far right.

After Cygnar deployed, Khador deployed their forces.
From the Cygnar left to right, The Man-O-War Kovnik hid behind his Destroyer beside the building.  The Field Gun and Mortar crews deployed on the Deployment line (10”), some distance behind the wall.  Sorscha and her War Dog set up behind the Behemoth, just to the right of the Wall.  Finally, the Man-O-War Bombardiers ended the Khador Line on the far right.

Start of Game


Turn 1:
Cygnar:
Haley and the Journeyman gave each their ‘Jacks a focus each. 
The Lancer spent its focus to Run into the woods with the Sword Knights.  Haley walked behind the woods and cast “Arcane Shielding” (add +3 Armour) on the Sword Knights.  On the far right, the Hunter ran forward, towards the Objective and woods on the right table side.  The Journeyman walked behind and cast Arcane Shielding on his Warjack as well.  The Long Gunners also ran forward, keeping more to the left of the woods.  Finally, the Defender stayed back behind the hill, waiting to see what the Behemoth would do.

End of Cygnar's 1st Turn


Khador:
Khador suffered the same issue as Cygnar for the 1st turn – nothing in range of their ranged weapons.  The Destroyer and the Behmoth both walked forward and fired their big guns, hoping for Deviation to land their shells on the Cygnar forces, but all missed their targets.  (All the Khador Jacks weapons had “Area of Effect” (AOE) and as such, had to scatter.  Cygnar weapons didn’t have AOE so couldn’t scatter.)

The Man-O-War Kovnik followed the Destroyer.  The Field Gun moved forward to the wall, preparing to shoot next turn.  The Mortar stayed where it was and fired at the Cygnar forces but also scattered out of harm’s way.  Sorscha and the War Dog followed the Behemoth, with Sorscha casting “Fog of War”, which cast concealment over everything in her control area, adding +2 to hit her troops with Magic or Ranged Attacks.

End of Khador's 1st Turn

End of Turn:
As neither side had reached an Objective, there were no Control Points earned on either side.


Turn 2:
Cygnar:
Haley and Journeyman both recovered their spent focus, then spent 1 focus each to upkeep their Arcane Shield spells.  The Journeyman allocated his remaining 2 Focus to his Hunter while Haley assigned 2 focus to the Defender and another to the Lancer.

On the right, the Hunter managed to move far enough around the woods to draw Line-Of-Sight on a Bombardier.  The Hunter took the shot, spending 1 Focus to boost the Attack Dice (3 instead of 2) and hit the Bombardier.  Using its last focus, the Hunter boosted its Damage roll while the gun’s special abilities cut the Bombardier’s armour in half – killing the Bombardier outright with 1 shot!  First Blood for Cygnar!

The Defender climbed over the hill and shot at another Bombardier, but in spite of the boosted Attack roll, missed the bombardier and was stuck with an extra Focus it couldn’t use.  The Long Gunners moved to the left and formed 2 ranks, then fired at another Bombardier using Combined Fire (The Chance of hitting and amount of damage are each boosted by 1 for every EXTRA gunner that shot at the same target), badly wounded a second Bombardier.

On the left, the Lancer moved out of and around the woods, onto the leftmost Objective.  Sword Knights ran forward through the woods, maintaining their Defensive Line on the edge of the woods – ready to leap out next turn.  Haley followed the Sword Knights into the woods and the Journeyman moved forward towards the objective on the right.

End of Cygnar Turn 2

Khador:
Sorscha recovered her spent focus, then spent 1 to upkeep “Fog of War” and allocated some focus  (I didn’t record how many) to the Behemoth. 

The Remaining Bombardiers moved towards the woods on the Right, but only one could draw Line-Of-Sight to the Hunter.  The Bombardier fired and managed to damage the Hunter.  The other Bombardier drew Line-Of-Sight to the Long Gunners and shot at them, but his shot deviated onto the Defender.  Sadly, the explosion couldn’t pierce the Defender’s Heavy Armour.

In the Center, the Field Gun crew shot at the Lancer, but missed.  The Mortar fired on the Sword Knights at the edge of the woods, but again, the shot deviated, this time catching Haley in the blast.  Again, the shell failed to cause any damage.  Finally, the Man-O-War Kovnik passed a command test to order the Destroyer to take a shot at the Lancer with a Boosted Attack roll.  The Destroyer is then able to use the “Jack Marshalled” ability to boost the damage.  The shot hits and damages the Lancer, but not significantly.

Sorscha and the War Dog moved up behind the Behemoth.

End of Khador Turn 2

End of turn:
The Lancer, controlling one of the Objective Markers, claims a Control Point for Cygnar!


Turn 3:
Cygnar:
Haley & Journeyman both paid to Upkeep their Arcane Shields.  Journeyman allocated both focus once more on the Hunter, while Haley gave 2 Focus to the Defender once more.

The Journeyman managed to make it to the Objective on the right, but was unable to draw Line-Of-Sight through the woods to shoot at a Bombardier.  The Hunter stood still and with boosted Attack and Damage rolls, shot and killed a Bombardier.  The Survivor passed its Panic Test, only to be shot at and killed by the Defender!

The Sword Knights ran out of the woods and formed ranks and a Defensive Line over the Leftmost Objective while the Lancer moved to the end of the line.  Haley moved out of the woods behind the Sword Knights.

End of Cygnar Turn 3

Khador:
Sorscha once more paid to upkeep the Fog of War.

First, the Field Gun crew managed to kill a Sword Knight.  First Kill for Khador!  Then the Mortar fired at and managed a Direct Hit on the Sword Knights!  The blast covered all but 2 Knights!  Incredibly, due to Defensive Line & Arcane Shield, none of the remaining Sword Knights were injured!

The Man-O-War Kovnik passed it’s command test to order the Destroyer to boost its attack roll again.  He then charged the Sword Knights, but failed his charge when he measured and fell short of his charge range!  Worse, while his weapons were out-of reach of the Knights, he was within the reach of the Lancer – meaning he was engaged in combat, but unable to reach anyone with his weapons AND unable to shoot!

The Destroyer marched forward and fired at the Sword Knight Line, but in spite of the boosted attack roll, missed and the shot Deviated onto the combat between the Lancer and the Kovnik, as well as a single Sword Knight.  Again, the deviated shot failed to pierce the armour of anyone.

The Behemoth Marched forward and took control of the Central Objective.  The War Jack turned its guns on Long Gunners.  One shot killed a solitary Long Gunner, the other deviated onto the Defender on the hill, but caused no damage.

Sorscha and her trusty Canine Companion moved to the right of the Behemoth.  Sorsch cast Razor Wind on the Long Gunners and killed 1 Long Gunner, while her Hand Cannon killed a 2nd.


End of Turn.
Cygnar gained 2 more Control Points for a total of 3, while Khador got their 1st Control Point.


Turn 4:
Cygnar:
Haley and the Journeyman both paid to upkeep their Arcane Shields.  Journeyman once more allocated remaining Focus to the Hunter while Haley assigned 2 Focus to the Defender.

(Remember I said earlier all Army lists are broken?  Here’s where Cygnar plays “Nasty”!)

Haley moved forward into the woods and cast “Temporal Barrier” with her remaining Focus.  Temporal Barrier causes all enemy troops in Haley’s Control Area (14”radius – I caught the ENTIRE Khador Army except for the Mortar Crew in the zone) to suffer -2 to their Defences and they are not able to charge or run!  Finally, Haley cast her feat: BLITZ – ALL Friendly Faction Models make 1 Additional Attack this turn, regardless to normal Rate Of Fire limitations!

(Graham just groaned and cursed that he hadn’t cast his feat last turn.)

The Sword Knights Declare charges and attacked both the Man-O-War Kovnik and the Destroyer.  The Sword Knights quickly overwhelmed and killed Kovnik, while the Sword Knights all used Piercing Attacks (Generate 1 Hit Point damage automatically rather than rolling damage) and inflicted 10HP damage on the Destroyer, seriously shaving off large amounts of armour!

With Kovnik dead, the Lancer was no longer engaged so it walked back onto the left Objective to hold it.

On the right, the Hunter peeked around the edge of the woods and took a boosted shot at Sorsch.  Though the shot hit, it was unable to harm her, in spite of being boosted damage.  In a questionable plan, the Long Gunners shifted to a line (ranks cannot fire through each other at a target the same size or smaller than themselves) so that all could see Sorscha and the War Dog.  The first shot hit and killed the War Dog easily.  In spite of her armour and defences, the second shot (due to Haley’s Feat) badly injured the Khador Warcaster!

With the War Dog gone, the Defender moved to the right to get Line-Of-Sight to Sorscha.  In spite of two boosted to hit rolls, the Defender’s two shots both missed Sorscha.

Khador:
Having been wounded, Sorscha put on a brave face and decided to face her imminent death with bravery and bluster!  She Maintains the Fog of War Spell, then casts her Feat: Icy Gaze.  Enemy Models in her Control Area that do not have immunity to cold are frozen and stationary for 1 turn!  This affected all the Long Gunners, the Defender and the Sword Knights engaged in combat with the Destroyer!

Sorscha then charged the Long Gunners (a mistake – she was still suffering from Temporal Barrier, but I forgot!).  Sorscha then killed 4 Long Gunners in Close Combat, but more importantly, her weapon left her “engaged” to both the Defender AND the Long Gunners!  Neither could take a shot while engaged in Combat!  Worse, they couldn’t reach Sorscha with their shorter ranged Combat weapons!

The Destroyer, facing frozen Knights, swung its axe and killed one of the Knights.
(In hind sight, it technically wasn’t engaged in combat as the Knights in Base contact were frozen.  It could have walked away, but we didn’t realize it at the time.)

The Behemoth, seeing Haley just inside the woods, fired both its guns at her, but missed, as did the Field Gun and Mortar.  Haley was a popular but difficult target to hit!

End of Khador Turn 4

End of turn:
Cygnar gained another 2 Control Points for a total of 5 while the Behemoth grabbed another for Khador for a total or 2 Control Points.


Turn 5:
Cygnar:
Haley and the Journeyman both pay the upkeep for Arcane Shield once more.

Haley, suffering hatred for Sorscha and “Target Fixation” at her wounded opponent, marches through the woods and, in a very Un-Cygnar or Haley moment, cast Chain Lightning on the closest Long Gunner.  Chain Lightning if it hits, lets the Lightning arc through the target through up to D6 other “victims”, working closest through the next target, etc.

The Lightning hit the hapless Long Gunner (Die for the Glory of CYGNAR!) and, to my dismay, rolled 6 more attacks!  The next closest Target was Sorscha and , as anticipated, the lightning hit Sorsch and Haley boosted the damage, then rolled something like 4 – didn’t even discolour Sorscha’s Armour!  The Lightning then arced over and killed all the remaining Long Gunners (DANG!).

The Sword Knights that could, moved into base contact with the Destroyer.  Confusing rules of Stationary with Knockdown, continued to grind away the armour of the Destroyer (only 2 or 3 Knights could have attacked and damaged the Destroyer.

Sword Knights Swarm The Destroyer

Finally, the hunter moved forward and shot the Behemoth for something to do, causing minor damage. 

Khador:
Sorscha upkept Fog of War (though it wouldn’t be necessary).

Sorscha maneuvered around the back of the Defender to do a Back-Strike (in error – rules state if an attack starts in the front arc, it cannot do a backstrike).  The swing did a Critical Hit and froze the Defender once more.  Swinging a second time, Sorscha knocked the Defender down to only 6HP left, disabling both arms and movement – leaving just the Cortex (brain) operational.

The Destroyer took another swing at a Sword Knight, but missed.

The Field Gun crew managed to kill another Sword Knight that wasn’t able to make it into Close Combat.

The Behemoth fired twice at Haley, and managed to hurt her finally.

Everything else missed.

End of turn:
Cygnar captured another 2 Control Points, for a total of 7, while Khador managed to grab 1 more for a total of 3.

Cygnar Wins!

End of Game!

============================================

Good Game for Cygnar!  Not so good for Khador.

As I stated earlier and throughout the report, we hadn’t played for a while and we did make some mistakes.  Mostly due to bad memory and “Heat-Of-The-Moment” excitement.

I insisted in a Random mission because if we just went for ‘Caster Kill, it becomes very stale, very quickly.  Not to mention trying to pound through all that Khador Armour is always a pain. 

We didn’t use the Steamroller missions because
  1. I forgot about them. 
  2. Graham didn’t have access to them before hand
  3. We’re “restarting” – need to do things as basic as possible(As it was, we both screwed up on some very basic points.)

As to army choices, I think Khador really suffered in this game.  While having 2 Weapons Crews may have increased the “shootiness” and long-distance damage capability for Khador, it was very inaccurate and it did restrict the potential to capture objectives.  Khador was limited to capturing objectives with the Behemoth, Sorscha and the War Dog, The Man-O-War Kovnik & Destroyer (they had to stay close to each other to work) and the Bombardiers.  All of which were “small” and vulnerable units.  The Bombardiers as a 3-man unit were taken out very quickly.  The Destroyer and Man-O-War Kovnik were both easily tied up with a unit of Sword Knights.  The only thing that really had a chance to capture anything was the Behemoth.  It’s so big a nasty, I don’t WANT to go near it!


On the other hand, if we had rolled Mangled Metal (otherwise known as ‘Caster Kill), Cygnar would have had a harder time as it would have taken so long to grind through Sorscha’s forces to get to her.

Thursday, December 4, 2014

BatRep: DW2 - 1500 Pts, Empire of the Blazing Sun vs Russian Coalition


Admiral Dimitry Orlov was relaxed on the train. After months of “Diplomatic Duties” with the Britannian Allies, the Russian Admiral was looking forward to getting back to his command. He especially wanted to return to his comfortable Flag Ship, the Battleship, Georgy Pobedonosets II ("St George the Victorious II" in English). He felt invincible when he was on his St. George! 

As the train pulled into the port and base of Vladivostok, Orlov blinked twice after looking over the harbor. Crews could be seen working on a new Fleet Carrier, probably the Kiev II, but of Georgy Pobedonosets II, there was no sign. Annoyed he would have to wait, the Admiral departed the train. 

“Admiral Orlov!” 

Orlov turned and saw a young Junior Officer running to meet him, flushed with excitement and out of breath. 

“Admiral! I’ve been assigned as your escort and temporary Aid until such time as you’ve had time to re-organize your battlegroup. I’ve arranged for your bags to be moved to your apartment. We can make arrangements to move what you need to your Command afterwards.” 

“I need no apartment. Send all my baggage to the ship. I’ll live there with the rest of the crew and officers.” 

“Yes Sir! At once, Sir!” 

Orlov watched the junior officer rush about, collecting the Admirals Baggage and directing the porters where to go. Once the luggage was dealt with, the young officer turned back to the imposing Admiral and directed him to a new staff car. As the car dove towards the harbor area, Oslov growled at his aid, "Where is the Georgy? I want to get aboard as soon as possible." 

"I'm sorry sir. The Georgy has been sent back to the dry dock for refit. It won't be available for some time." 

"WHAT?!?!? No one told me! What am I supposed to do for a Command Ship?" 

"We've been assigned a new ship for now. The Ivan IV Vasilyevich. If you approve, it will remain your Command Ship. If you prefer, we can move you back to the Kiev II, but it's not quite ready for duty yet." 

"I've not heard of the Ivan before. What is it? Another Borodino Class?" 

"No sir. It's, well - there it is now!" 

Orlov turned to look out the window at a new Moskva class Dreadnought. A smile tugged at the corners of his mouth. 

I’ll just have to show them what I can do with THIS! 

======================================== 

So, after “real life” interfered with my gaming for the last couple of weeks, I arranged the better part of a day to do a full 1500 point battle. After dropping my wife off at work (waaaay too early in the morning), I picked up my friend on the way home and we proceeded to demonstrate the classic “Everything that could go wrong…” type of mission. 

First, we planned our fleets in advance. I decided to dig out the poor Russians who’ve been ignored for quite a while. Graham brought out the Evil Empire of the Blazing Suns. After the usual harassment and boasting, we got down to fight out the battle! 

The Russian Coalition won the Strategic Advantage, whereas the Empire took the Operational Advantage. The table had Massive islands in the Centre North Edge, the South West and the South East corners. Russians chose the North Edge and the Empire took the South. Neither side had flanking or advanced deployments, nor reinforcements for later. 

Russian Deployment (RC) East to West: 
  • Pesets Submarine with Target Painter (Primary Guns) 
  • Fighter SAS (5) 
  • 3 Saransk Skyships
  • 3 Novgorod Frigates 
  • Pests Submarine with Target Painter (Primary Guns) 
  • Moskva Dreadnought with Target Jammer (Commodore’s Command Ship) 
  • Kostroma Fleet Carrier with Target Jammer, Fighter SAS (5) & Fighter SAS (4) 
  • 3 Tiksi Support Cruisers 
  • 3 Saransk Fliers 
  • 3 Novgorod Frigates 
  • Fighter SAS (5) 


Empire of the Blazing Sun (EotBs) East to West: 

  • 3 Tetsubo Interceptors 
  • Tenkei Sky Fortress with Fighter SAS (5) & Recon 
  • 4 Yurgi Destroyers 
  • Kiyohime Assault Carrier with 2 X Torpedo Bomber SAS (3) (Commodore’s Command Ship) 
  • Fighter SAS (5) 
  • Fighter SAS (5) 
  • Hachiman Dreadnought with 3rd Gen Shield & Tesla Generators 
  • Tsukuyomi War Gyro with Disruption Generator 
  • Ika Mechanical Squid 
  • 2 Tanuki Armoured Cruiser 
  • 2 Inari Scout Gyros 

All Fliers started Obscured and the Subs were Submerged (I left the "Surfaced" models on the table for the photo so they would be easier to see). 

Start Of Game

Turn 1: 

In the TAC phase, the Empire played “Lost Orders", but it was cancelled by the Russians with the same TAC. 20 points each! (Although it appears we are becoming predictable…) 

Russians won initiative. (Not that I wanted it…) 

The Russian sub on the west of the island stayed submerged and moved forward. The Empire's Dreadnought rolled an extra 3” move on the Tesla Generator and advanced full speed. The Dreadnought concentrated its fire on the Russian Carrier and damaged it twice, lighting 2 fires with its Incendiary Weapons. 

The Russian Carrier Burns...

The Russian Cruisers moved forward and fired their Mortars on the Dreadnought, the weight of combined fire damaged the ship. The War Gyro moved forward, over the west island. Gyro aimed and fired on one of the Tiksi Cruiser and crit the Russian Ship (Engine Damage) as well as lit a fire. 

On the east of the island, the Russian Sub stayed submerged and moved forward. 

On the western side of the south-west island, the Ika Squid stayed submerged and played “Stoke the Engines”. Realizing I had picked up the wrong card for my deck, I cancelled it with “Flank Speed”. Though it was a 60 point card to cancel the 40 point "Stoke the Engine", I didn’t have a use for “Flank Speed” as it is used to bring on a Flank or Reinforcement Detachment. I had neither. The Ika moved forward at its maximum speed. 
The Russian Carrier first repurposed its two SAS wings as Torpedo Bombers. The Carrier then turned slightly to port and fired its broadsides at the War Gyro, damaging it. Scout Gyros dropped from the clouds and moved forward to fire on the damaged Tiksi Cruiser, and damaged it again with another crit (Generators Offline) as well as lighting another fire. Counter-Attacking, the Saransk on the West dropped below the clouds and fired on the Scout Gyros, causing a double-Crit (missed a Triple by 1 hit), and caused Nav Lock and Generators Offline, as well as knocking off an AP for Concussive Effects. After the volley, only 1 Saransk managed to climb back into the clouds. Finally, the Empire’s Armoured Cruisers advanced and fired on the Tiksi Cruisers and the damaged Tiksi was finally sunk with a Crit – First Blood to the Empire of the Blazing Suns! 

First Blood - A Tiksi is sunk!

Russian Frigates moved forward at maximum speed on the west side of the map, but had no targets. The Empire’s Carrier re-purposed 2 squadrons of Dive Bombers into Torpedo Bombers (those Pestes had him worried). The carrier then turned to port, lined up its torpedo tubes on the closest sub and discovered the sub was out of range! Frustrated, the Carrier fired its guns on the Russian Carrier and caused another hit point AND another fire (the 3rd this turn)! The Russian Dreadnought failed to activate its Sturginium Boost, but moved forward its maximum speed and was able to damage the War Gyro with its Broadsides. 

The next little bit was the “Flight of the Tiny Fliers” phase. (Not a real phase. It just seems that once 1 person starts using their SAS, both sides use them until they (just about) run out.) Players alternated activating their SAS: Both Empire’s Torpedo Bombers headed for the Russian Subs, Empire Fighters hovered over the South-Western Island – just out of Russian Fighter range, while the Russian Torpedo Bombers headed towards the Ika Squid, escorted by a squadron of fighters. Next turn was going to be really interesting… 

Finally, the Empire’s Destroyers sallied out and launched a torpedo attack on the Russian Carrier – finally caused a Crit on the great ship (Engines Damaged) as well as a 4th Fire AND caused the Carrier to lose its Ablative Armour! (Uh-oh!) The only good news was that the Fuel Reserves didn’t catch fire! Concerned that the Empire’s Torpedo Bombers might be tempted next turn to change their targets, the last Russian Fighter Squadron moved in front of the Russian Carrier – able to support both the Carrier and the Torpedo Bombers next turn (I HOPED)! 

Russian Carrier In TROUBLE!!!

The 2nd squadron of Russian Frigates moved behind the island towards the stern of the Russian Dreadnought, trying to get to the Carrier to provide more support, but just didn’t have the speed to do it. From the East Side, the Empire’s Interceptors stayed in the clouds and turned towards the table center – the main Battle Zone. As the final Russian Activation, the Saransk on the east side of the formation stayed in the clouds, moved over the Northern Islands and took a shot at the Empire’s Dreadnought (the only thing in range), but failed to damage it. 

With no reaction possible from the Russians, the Sky Fortress’ Fighter SAS and Recon flight moved. Then the Skyfortress itself dropped from the clouds, fired on a Saransk and caused a Damage Point and a Crit (Nav Lock) as well as 2 Fires. The Sky Fortress failed to climb back into the clouds.

Saransk Set On Fire by Sky Fortress!

In the End Phase, the Empire had nothing to repair. The Russians successfully repaired all outstanding damage. Sadly, they were not as effective putting out fires. The Saransk lost an AP as it still had 1 fire burning and the Carrier still had 3 fires out of control and lost 3AP! ARRRGGGGHHHHHHH! 

(I really don't like Incendiary Weapons!) 


And the Russians Continue to Burn!


VPs: 
EotBS: 165
RC:       60 

End of Turn 1


Turn 2: 

In the TAC Phase, the Russians played “Battlefield Repair” on the Carrier – repairing 2 HP AND restoring Ablative Armour in the process! The Empire played “Radio Intercept” and gained +2 on the Initiative Roll. 

The Empire of the Blazing Suns won Initiative! (It was a tied roll except for the “Radio Intercept"!) 

Empire Fighters swarmed down on the larger Russian Torpedo Bomber Squadron and shot down all 5 tokens for No Loss! OUCH! The Smaller Torpedo Bomber Squadron launched their attack on the Ika and managed to Crit the Squid (Shredded Defences), but more importantly, forced the submerged Squid to Surface! 

Ika is Forced to Surface!

In one of those “Use it or lose it” moments, the Ika moved forward on the surface at maximum speed towards the Russian Carrier, but couldn’t reach it. The Squid’s guns did manage to damage the Carrier once again, but then the Squid failed to dive to safety. 

Ignoring the Ika (it wasn’t going anywhere), Russian Fighters attacked the damaged Scout Gyro. In a totally miffed roll, the Fighters lost a token for no damage to the Scout! Empire Fighters then proceeded to attack the Russian Fighters, but only shot down 2 tokens for a loss of 3! Russian Saransk Skyships on the west all moved into the clouds and moved forward – dropping mines to hamper the Empire’s Cruisers, then blew up the undamaged Scout with a QUADRUPPLE Crit (we only rolled for 3 – the Gyro was gone at that point), then boarded and prized the damaged Scout for the loss of 1 AP! Russians earned 240 VPs in just 1 Activation! 

First, a Scout Gyro is destroyed..

..then the Second is PRIZED!!!


Empire’s Torpedo Bombers attacked the Russian Sub in the East, but Concussion Charges stopped all the enemy torpedoes. 

The Russian Commodore on the Dreadnought activated his ability: “Sturginium Overload” – ALL Russians automatically pass their Sturginium Boost tests this turn AND any units without Sturginium Boost gain 1” movement! (Never tried it before – should be interesting!) Sadly, this ability can only be used once per battle. The Commodore then played “Stoke the Engines” on the Dreadnought, but it was countered with Espionage (a free 40VP for the Russians). The Dreadnought moved forward and turned to port, screening the Russian Carrier as best it could. The Dread fired its main guns on the Empire’s Dreadnought and crit the Dread (Nav Lock – Missed Double-Crit by 2 hits!) as well as forcing the Enemy to lose an extra Assault Point. Not finished, the Russian Dread’s other weapons crit the War Gyro (Generator Offline & -1 AP), damaged a Destroyer and shot down 2 tokens from a Fighter Squadron! Way to go, Dread! 

The Empire’s Dreadnought, suffering a little, played “Devastating Barrage”, which the Russians cancelled with the same Card (We ARE becoming way too predictable!). The Empire’s Dreadnought still managed to damage the Russian Dreadnought with a Crit (Engine Damage) and 1 Fire token. Keeping the pressure on the Empire’s Dreadnought, the two remaining Tiksi Cruisers raced forward and fired all their mortars at the Dreadnought, managing another HP of damage. The Empire’s War Gyro dropped from the clouds and turned to starboard to deal with the threat, crit one Tiki (Nav Lock) and started a fire, then failed to damage the Russian Carrier (Ablative was still up – by 1 point). The Airship failed to climb into the clouds. The Russian Carrier replenished the under-strength Fighter SAS nearby, made its minimum move (BARELY missing the Russian Dread’s stern), fired broadsides back at the War Gyro and damaged it! 

Back in the East, the Empire’s Interceptors stayed in the clouds and fired on the Saransk squadron, but failed to damage them. The Russian Sub in the East of the island surfaced, moved forward and fired on the Empire’s Carrier, but failed to damage it. The Sub successfully slipped beneath the waves after its attack. Angered, Empire’s 2nd Torpedo Bomber Squadron attacked, but once again, the Sub’s CC proved too effective – no damage! 

In an attempt to hamper the Empire’s Destroyers racing towards the battle zone, the Eastern Saransk flight dropped from the clouds and staggered mines to block the channel between the Empire's Dreadnought and the Northern Island, then fired on the Dreadnought but caused no damage. One Saransk was unable to escape back into the clouds. Empire Fighters jumped on the helpless Russian and caused a double Crit (Fusion Leak – 2 Corrosive Markers & Guns Damaged) for the loss of 2 tokens! 

The Eastern Russian Frigates completed their maneuver around the stern of the Russian Fleet and fired on the War Gyro as they completed their blocking action to the Russian Carrier. In complete surprise to everyone, the War Gyro was shot down by the Frigates! 

War Gyro Shot Down By Frigates!

Ignoring the shock of the loss of the War Gyro, the Empire’s Armoured Cruisers made minimum moves forward. Their rocket attack failed to damage the Carrier (only 1 hit) but their guns crit a damaged Tiksi Cruiser (Fusion Leak – 3 Corrosive Counters) & 1 fire AND the Cruiser lost its Ablative Armour. The Empire soldiers then donned their flight packs and successfully boarded and recaptured the low-flying Scout Gyro! (This left the Scout Gyro a Derrelict, but reducing the Victory Points for the Russians from Double original value to ½ original value – costing me 120VP! Still, I have to give credit – this was the first successful re-taking of a ship in all our games that I can remember.) 
The Western most Russian Frigates opened fired on the Squid and caused another HP of damage. 

The Empire’s Ships Captains then proved how devious they are. Snaking between the Empire’s Dreadnought and the recently dropped mines, the Empire’s Destroyer squadron moved across the Battle Zone and attacked both the Tiksi & Saransk on the West side of the battle zone. Fortunately for the Russians, no damage was done to either. Russian Fighters shot down the last 3 tokens of an Empire Fighter Squadron for the loss of 2 tokens. The Empire’s Carrier moved forward and fired its torpedoes once more at a Russian Sub, this time critting it (Fusion Leak – 3 Corrosive Tokens. What is it with Fusion Leaks this game???). The Russian Sub, thanks to Reinforced Bulkheads, did not surface. The Carrier then shot down a damaged Saransk but failed to damage the Tiksi. 

Saransk Brought Down By Empire's Carrier!

As the last Russian Activation, the western Sub stayed submerged and sailed under the Russian Carrier hull, out to the other side. 

The only two activations for the Empire was the danged Recon plane that buzzed around the Eastern half of the map and the Sky Fortress that turned to port and attacked the Saransk, but failed to damage either. 


In the End Phase, the Empire’s Dreadnought successfully repaired its Navigation Lock, but the Ika failed to repair its Shredded Defences. For the Russians, it was much worse. Both the Sub and the Tiksi failed to repair the Corrosion leaks before they were sunk for more “free” Victory Points for the Empire. The Carrier and Dreadnought, however, did successfully repair all damage AND put out all fires! 


Casualties to Corrosion!


VPs:
EotBS:  505
RC:       435 

End Of Turn 2


Turn 3: 

In the TAC Phase, the Empire tried to play “Battlefield Repairs” on the Dreadnought, but it was cancelled with “Prepare My Personal Transport”. I just couldn’t allow the Empire the chance to repair the Dreadnought. It was too difficult to damage in the first place. At full power, it could win the game on its own. 

Russians won the Initiative. 

The Russian Dreadnought – hoping for another Crit on the enemy Dread made a Minimal move and fired the main guns once more – but this time only managed to damage the Empire’s ship. That was disappointing! Other attacks resulted in damage to the Sky Fortress, a Crit on the Aki (Chaos & Disarray – no Boarding until repaired!) and failed to damage the Carrier.  Not bad, but not what I wanted!

Empire fighters returned to the Sky Fortress, searching for reinforcements. The Russian Carrier fired on the Ika and in a dazzling skillful roll, completely missed the Ika – not 1 HIT! The Ika made a turn to starboard and sank a Russian Frigate with guns. 

Ika Sunk a Frigate!

The Russian Sub stayed submerged and activated the Target Painter and “painted” the Ika, then turned to port, under the Ikea and beyond. 

The Empire’s Dreadnought, after he finished laughing at the Russian Carriers efforts, moved forward at maximum speed and repeated it! Failed to damage the Russian Dreadnought, nor either of the two Saransk it targeted! (I was accused of cursing my opponent’s dice at this point. Don’t know what he expected – my “power” is completely indiscriminate. It curses me, too!) 

The Russian Frigates moved into short range to the Ika and thanks to the Target Painter, sank the Squid with their Primary Guns at RB1 (11 dice hitting on 4+)! Revenge for their fellow squadron mate! 

Ika Sank By Frigates!

The Empire’s Sky Fortress replenished a Fighter Squadron to Full Strength, moved forward and fired on the damaged Saransk. Surprisingly, no damage was caused by guns or rockets! The Eastern Saransks dropped from the clouds, fired at the Carrier but failed to damage it. They then played “Breakneck Maneuver”, allowing all the squadron to use Evasive Maneuvers to climb back into the clouds on a 2+. This time the entire squadron escaped into the clouds successfully. 

Empire’s Destroyer squadron charged forward, damaged 2 Frigates, sank a 3rd, Crit the Russian Carrier (Raging Fires: rolled 3 fires, +1 for Incendiary Weapons, but Fuel Stores didn’t go) for a total of 4 Fires on deck AND caused the Carrier to lose its Ablative Armour AGAIN! OUCH!!!

Destroyers Wreck HAVOC!!!

Back on the Western side, the Saransks dropped from the clouds and managed to damage an Armoured Cruiser, then boarded and left the 2nd Derelict (I wasn't going to take the chance it would be re-boarded with the other Armoured Cruiser still afloat)! 

Armoured Cruiser is Boarded and Left Derelict!

The Empire’s Interceptors dropped out of the clouds and fired on the Russian Carrier, damaged it once more and lit another fire! How the Carrier stayed afloat was anyone’s guess! 

The Russian Tiksi moved forward and fired their Mortars on the last Armoured Cruiser, causing a Crit (Generators Offline). The Empire’s Cruiser snaked through the mines and damaged 2 more Russian Frigates. The Russian Frigates flanked the Cruiser and damaged it in return. 

Once again, we entered “Flight of the Tiny Fliers” Phase. Torpedo Bombers from both sides headed to their respective carriers as did some fighter squadrons. One Empire Fighter SAS attacked a Russian Fighter SAS and was destroyed while the Russians lost 1 token. Another Russian Fighter SAS attacked and destroyed the last 3 Fighters of another SAS for no loss. Empire was running out of Tiny Fliers, but had Carriers whereas the Russians had Fliers but the Carrier… 

In the final activations of both sides, the Empire’s Carrier re-purposed some Torpedo Bombers as Fighters, then turned to avoid a collision with their Dreadnought. The Russian Carrier moved forward minimum move, also avoiding collision with the Russian Dreadnought. 

In the End Phase, The Russian Carrier only put out 2 fires and lost 3 AP to the Fire-Fighting Efforts. A Saransk lost 1 AP to fire and another was still stuck at ½ speed. 

At this point, the game had to be called due to time. After a long and exhausting battle, both sides pulled back to count their losses. 

End Of Turn 3 & Game!


VPs: 
EotBS:
635      Mission: 50% & all Smalls - Both Incomplete
RC:       695      Mission: 70% - Incomplete 


A Draw! 


======================================== 


WOW! NASTY Battle! And it was a DRAW! And we ran out of time! 


What did we learn? 
  • Recording moves and taking photos really slows down a game! This game played ~5 hours. If I hadn’t slowed things down by taking notes and photos (not to mention lunch), we probably could have finished the game in the same time period. Even as slow as two Grumpy Old Gamers like we are! 
  • DOUBLE-CHECK the TACs you pick up! Both my Opponent and I have now picked up the wrong card for our TAC deck and been put out about it. It’s embarrassing when you have to confess that you screwed up. On the other hand, it gives you another (expensive) Counter-Card for your deck… 
  • Dreadnoughts are HARD to Kill! A lot of Russian Fire was directed against the Empire’s Dreadnought and we were basically shaving off 1 hull point at a time throughout the game (except for one brilliant moment where my Dread almost caused a double-crit!). Likewise, the Russian Dread was very hard to damage and was in no real danger of sinking this game. 
  • Russians: BUY JAMMERS!!! The Carrier and the Tiksis didn’t to save points. Next time, I probably will save the points elsewhere! The number of fleets that don’t have either Rockets or Torpedoes is small! In tournament or random opponents, you’ll need them more often than not! 

In all honesty, I think the Blazing Suns would have won the game in a turn or two. They nearly had the points and all the Frigates were damaged, so it wouldn't be too long until they were sunk. Myself, the Russians had a Loooong way to go to make that 70% and I would have to make the Empire's Dreadnought sink first (I think).


The Russian Critique: 

Starting with the Moskva Dreadnought, I LIKE IT! Yes, its guns are incredibly short-ranged, but once it gets into RB2, it is a force to reckon with! While expensive, I would recommend taking the Jammers and contemplate copying it with anything that’s got a Mimic! Best Jammer of the fleet! 

The poor Kostroma Fleet Carrier took a HUGE beating this game! Constantly on fire, lost its Ablative Armour not once, but TWICE. It still managed to do damage with its Broadside weapons while the deck crews restocked squadrons whenever it was required. If the game had gone on one more turn, I’m pretty sure I would have lost the Carrier but she put up an incredible fight! Next time I’ll add the Jammers and maybe bring a second! 

The Saransk Skyships did good work this game as well. As I predicted, it’s better to take full 3-ship squadrons and (better still) take 2 Squadrons! While the mines didn’t work as well as I’d hoped (Danged “Sharp Turn” rules!), they did impede my opponent’s maneuvering. The Main Guns and the Boarding Potential of these ships cannot be ignored. 

The Pesets Submarines were fun. I took them for the extra activation (I could have used them as a squadron of 2 instead of 2 squadrons of 1) and the use of the Target Painter (Primary) Generator so that I could “Paint” his Dreadnought, then blast away with My Dreadnought with +1 to hit. Unfortunately, I never got close enough to try it against the Dread, but it proved effective with the Frigates needing 4+ from RB1 on the Ika Squid! The Subs are vulnerable to torpedo fire and concussion charges, though. I think they could have been more useful as “Advanced Deploy”, but if I did that, they would need some sort of support to help distract enemy fire from them in the first turn. Maybe if I deployed both Subs AND the Saransk as Advanced Deployment… 

This was the first time I tried the Tiksi Support Cruisers. The Mortars are potentially a very nasty surprise, providing effective RB3 ranged attacks in a fleet that otherwise suffers for it. I can see why others are afraid of “Spamming” Tiksis, but to me, they aren’t intended as a replacement to the rest of the fleet. They’re slow, weakly armoured, deficient in RB1 Defensive Weapons and expensive if you add the Jammers. They really do need protection from the rest of the fleet. Tambov Gunships would be a good alternative as they are faster, better CR rating, come with Jammers for free and have great guns for RB 1 & 2 for the same points cost as the basic Tiksi. If you want distance – take Tiksi. If you want to close fast, take Tambov. Maybe take both: Tiksi providing long-range support for Tambov as they close. Tambov protects Tiksi! 

That just leaves the Novgorod Frigates – a Russian favorite! They have a decent punch, are a little slow but have fantastic maneuverability. They’re good for both offensive and defensive purposes. Don’t leave home without them! I would have liked another squadron, but just didn't have the points with all the other toys I had taken. 


While I’m still on the topic of Russians, maybe I should give a quick explanation about my strategy for this force. I deliberately set my force on one table half. The Russian Fleet is not long-ranged – I needed to treat it like a Brick! Throw the whole force at one point in the line and “break” it. When my foe took up most the table edge, he had a hard time bringing his entire force to bear at one time. My force was (more or less) together and each unit was able to support or be supported by other units. 

It was working, too. Sort of. The Sky Fortress and Interceptors were racing into battle all game (though they did cause some damage), the Destroyers were forced to do some fancy maneuvering and really didn’t get into battle with all weapons until Turn 3 while the Sun’s Dreadnought was blocking its Carrier's fire lanes to many potential targets. The West table edge was mine – only 1 damaged Cruiser remained (of course, I am ignoring the recently arrived Destroyers in turn 3). The Sub was ready to paint the enemy Dreadnought next turn and at RB2 (possibly 1), the Russian Dreadnought was near full capacity with its Primary Guns, with +1 to hit. 

I was nervous about taking 2 Squadrons of Saransk and only 1 Squadron of “Shooty" Naval Ships, but I wanted some chance of dealing with the Empires Gyros (always a pain for the main fleet). I wanted/needed the Air Hunter on the Saransk as I expected 3-4 Gyros. Surprisingly, the Frigates finished off the War Gyro and the Saransk dealt with the Scouts quickly. The Saransk on the West edge then successfully fought against Naval Assets successfully once the Gyro Threat was neutralized on their end of the Battle Zone. 


The Empire Critique: 

Did I mention Rockets? I hate rockets. Especially Incendiary Rockets (and any other Incendiary Weapons. My biggest issue fighting the Empire of the Blazing Sun is all the Blazing that was happening – especially on my Carrier Deck! We burnt the Marshmallows, the hot dogs and worst of all – The Vodka in the Forecastle! Many a Russian sailor died trying to retrieve the Admiral’s Booze!  More importantly, having to roll all those dice to put out the fires in every end phase really slowed down the game. (That’s my story, I’m sticking to it!) 

While the Hachiman Dreadnought was an anticipated choice, I think I would have saved a few points and not bothered with the “borrowed” Prussian Tesla Generator. It really didn’t help it at all and the star of the ship was the 3rd Generation Shield Generator. My opponent was making some terrific saves - I think he was averaging 3-4 saves against every attack. A very tough ship, it suffered some appalling dice rolls this game in its attacks. I may have cursed the ship more than the dice. 

My opponent didn’t have access to a Fleet Carrier, so I can’t fault him for taking both a Kiyohime Assault Carrier and a Tenkei Sky Fortress. He needed the extra SAW to deal with my Fleet Carrier. The Tenkei Sky Fortress was set up on the far side of the table and though it spent most the battle trying to move into the main battle area, it did inflict some damage with its weapons. I think the Sky Fortress was just unfortunate in that it was set up early and on the wrong side of the table. Bad luck on its part. The Kiyohime suffered with having to shoot around the Dreadnought which blocked its lines of fire to some of the easier targets. Worse was when he discovered that his Carrier was in range to use its Disruption Generator to kill my Dreadnought's Target Jammers, then realized his Dreadnought would also be affected. In the end, he decided not to activate the Generator because he needed the Shield Generator on his own Dreadnought!  Tough Choice!  Overall, I think both Carriers were good choices but were poorly positioned due to my deployment crowding the Battle Zone. Not entirely his fault. 

The Tsukuyomi War Gyro suffered the same issues for its Disruption Generator– too close to the Dreadnought and so it couldn’t disable my generators without affecting his. Not a good choice to have to make. While the War Gyro was able to do some damage, it suffered from the fact that it was “easier to kill & in range” compared to the Dreadnought. Anything that couldn’t hurt the Dread seemed to shoot at the War Gyro, resulting in it being damaged early and eventually being brought down by lowly Frigates. It really didn’t get the chance to show off what it could do. 

Same can be said of the Inari Scout Gyros. I knew they would be an issue and I took the Saransk specifically to deal with such a threat. BOOM! Threat gone! I didn’t want to give the Scout Gyros the chance to do more as I’ve suffered at their hands before. I considered the Scout Gyros with their Rocket Broadsides one of my top 3 threats on the board as soon as they came out. A good choice, but vulnerable to other Air-Hunter attacks. 

The Tanuki Armoured Cruisers were a nice touch. As I said before, this was the first time that either of us can remember successfully re-capturing a prized vessel in our games. Good fire power, good boarding potential and nice Crit Rating of 8 made these ships a tough fight. I think they suffered from a lack of numbers more than anything else. At 85 points each though, they are expensive for a Medium Sized choice. 

My opponent complained I was too scared to let the Ika Mechanical Squid into a boarding action against my Carrier. I had to point out to him that we’ve never completed a Boarding Action with Robots before. He should have thanked me for saving us time and aggravation for looking up new rules we hadn’t used! He didn’t buy it. Too bad. 

The Tetsubo Interceptors were deployed too far away and in too few numbers to make a meaningful impact on the game. Their low numbers meant that they just couldn’t put in a big enough punch to do the damage they needed to do when the time was right. They are pretty fast though (but then so is everything else to the Russian Fleet!). ;-) 

Finally, the Yurgi Destroyers were the fleet’s only naval small choice – a brave decision! Sadly, I think they were misplaced as well and not able to make the impact the way they should or could have. The Sharp Turn and Rocket Batteries kept them out of trouble and in the fight. I can’t help being thankful they didn’t get into real Combat Range and able to use all their weapons until Turn 3. I’ll have to keep an eye on them in the future. 

Anyway, another great game with Thrills, Chills, Cheers and Jeers! Hope you enjoyed this report! 

Good Luck on the table!

Wednesday, November 12, 2014

Product Review: SG2 Creations Observation/Control/Guard Tower (A Prototype Test model)

A friend of mine, Byron, got a hold of a Laser Cutting System and started making his own buildings, walls, etc. from MDF boards.  The problem we seem to have here in the middle of the Canadian Prairies, is that by the time we order in similar terrain products, it becomes cost-prohibitive.  Byron decided to start designing and selling some of his creations to others as a low-cost solution for Canadians.  Anyway I’m taking advantage of his Generosity!

Byron’s already posted a number of items he has available on his Website:
http://sg2creations.com/

Byron, gave me the opportunity to get one of his new creations.  A Control Tower, intended for 28mm Miniature games.  This is a “Prototype” design.  He was still playing with the design before he made it available through his web site.  But I saw one proto-type and begged to have one for an Infinity Campaign I was planning.

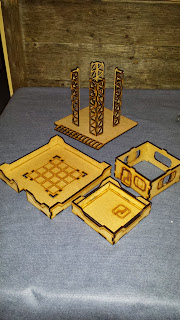
For a Prototype, the kit was well done.  MFD, in case you never used it, is like a thin plywood, though it is compressed fibers rather than layers of wood.  You can use White glue to put it together, but I prefer a carpenter’s wood glue – just to be safe.  The kit contained the legs of the tower (4 pairs of inter-locking pieces), a base plate, a tower platform, a roof for the hut, 4 walls for the hut (1 with a door), rails or Parapet walls for the Platform and a unique roof lock and parapet system consisting of 8 pieces.

Lotsa Parts!

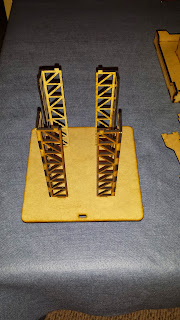
The first thing to do, was to assemble the legs.  When assembling the legs, first split the legs into 2 sets.  Narrow “pegs” are the top, Wider Pegs are for the base.  The interlocking patterns can then be matched and you can glue a pair of legs together, each pair split at a 90o angle.  After gluing all 4 pairs of legs together (and while the glue was still wet), I then glued the legs to the base plate and pressed (not glued) the platform on top of the legs to ensure the angles of the legs were right.  I then put the assembly to the side to let the glue dry.  When dry, I removed the Tower Platform.

Legs Mounted on the Base Plate

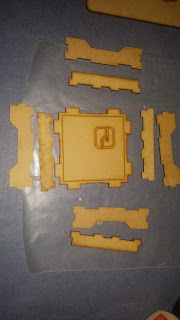
I then started the roof of the Tower Hut.  First, I separated the pieces as shown.  Again, the parapet is interlocking – 2 sets of interlocking parts.  Each set is 2 pairs of parts.  I test fitted everything before I applied glue in the corners and the slots that would fit over the tabs on the roof.

Before Assembling

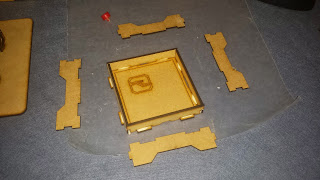
Assembling first set of Parapet Walls

While the glue was still wet, I then again test fitted and applied glue to the taller, outer parapet walls, this time adding glue to the inner surface so it would adhere to the first layer of the parapet.  I used “Magic Tape” (I intend to sand this anyway), but you could actually use rubber bands to hold it together.  I then put this assembly aside to dry. 

Roof Assembly Completed

The reason for this “Double-Layer” of the parapet on the Hut Roof was to form a unique interlock with the Hut Body.  The Parapet will form a “keystone” lock with tabs along the top edge of the Hut walls when assembled.  This will make it easier to pull the roof off to access the interior without disturbing the rest of the tower.

Once the roof was dry, I started on the Hut Walls.  (Sorry!  I forgot to take pictures of this process!)  Again, the walls of the hut were interlocking.  I removed the door first (it was mostly cut off – I just had to break/cut a small tab with a Xacto Knife).  I then test fit the walls to ensure I was gluing the correct parts together.

I had a stroke of inspiration before I glued the hut together.  To allow more flexibility, I decided not to glue the Hut to the platform.  This would allow me to remove the Hut and use the tower as a Flak or Weapon Platform as well as a Guard/Observation Tower.  To do this, I laid wax paper on top of the Platform, cut slits where the Hut Walls’ tabs would fit and then glued the walls together on the edges only, using the Platform (with Wax Paper to catch drips) and the Hut Roof to provide proper spacing and alignment!

Once dry, I added the parapet walls to the Platform floor.  The platform had an indent for placing a ladder (more about that later).  The long Parapet walls went on the other 3 sides and then 2 smaller parapet walls joined the longer walls and ended at the edge of the ladder access.

At this point, the main parts are assembled and you can glue it all together at this point.  The ladder has a tab that glues into the base.  It has a unique cut, designed so that a typical 25mm-round based figure (such as GW or Infinity) can be posed partway up the ladder.  Depending on the balance and pose of the figure, it works quite well, though you may want to keep some Blue-Tac handy to stick under bases – just in case.

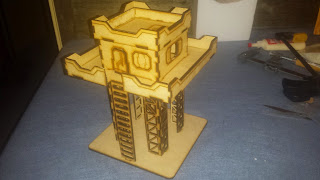
Finally Assembled and Waiting For Sanding & Paint!

A More Clear Picture


I’ve left the platform separate for now so that I can paint the legs and platform building separately.  I told Byron of my idea of making the platform muti-purpose and he suggested that he can cut the Platform without the burned floor pattern.  I don’t think it’s necessary as if you don’t want the pattern, simply flip the board over and put the pattern on the underside where no one will see it.

The Main Components, Separated

The tower stands about 6.25 inches from the base to the platform surface, 8.5 inches to the roof of the hut, 9.5 inches from base to top of the hut’s parapet.  The Tower base and platform form about a 7 inch square (inside the parapet).  Lots of room for a 25mm or 30mm based figure.  The Hut forms another 4 inch square, internal and on the roof.  Parapets are 1 inch tall in the corners, then drops to ½ inch along the lengths.  Kneeling figures should be able to pose over the parapets midway between the corners while standing figures should have lots of cover to peer over the corners.

Models Test-Fit the Tower

Overall, I like the ease that the tower went together.  I’m going to seal the ends and sand most the surfaces before I finish painting the tower.  While being so tall may make it difficult for some models to climb in a single turn in most game systems, I like it as is.  Byron probably could be talked into doing shorter legs if you wanted them, but that would ruin the aesthetics, I think.  It will make a great center piece for a Shipping yard, or a guard tower for a base.  Construction is simple, straight-forward and rugged.  I hope Byron adds it to his regular lineup soon!  I want another already!


Anyway, go check out SG2 Creations’ web site and give them a try!  If you have any ideas for Byron to try, I’m sure he’d love to hear from you!